With JavaScript, anybody can take a boring old site and add something exciting. Each of these items showcases what can be accomplished with JavaScript, and just how fun the possibilities can be. Click an image and try it out!
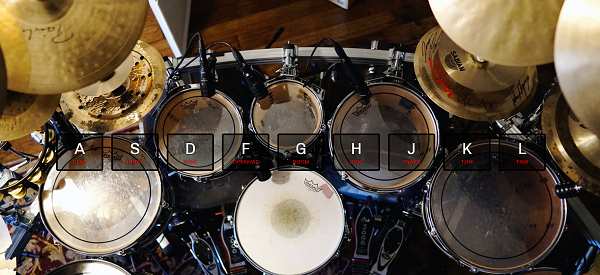
For my first challenge, I chose to create a ‘JavaScript Drum Kit’. It seemed to be something fun to go into the arcade, and it seemed like a great way for me to explore the interactivity of JavaScript. Through this exercise, I learned how to utilize the “eventListener” function which allowed me to discover how certain aspects of the JavaScript program functioned (or failed to function). In conjunction to this, “console.log” I discovered was how I would be able to see what that functioned returned. By utilizing that function, I learned about keycodes. I also learned about the “event” variable, ‘e’, which allows me to instruct a function to operate upon the initiation of a certain event. When it came to the animations of the program, I learned how to rewind an animation immediately upon repetition of its triggering event and how to remove the result of that animation.
In addition to getting it completed and functional to begin with, I’m proud with how I was able to modify it. I changed the background into a drumkit, the font to be “Chivo” to be cohesive with my overall theming for this project, and the colors of the program. Changing the color of the animations were particularly tricky as I had to repeatedly activate the function while inspecting it in order to discover what class was being used and how that class was used. I made sure the ‘return’ function was visible against the background by coloring its bar in the same way I colored the bars of the other pages.
To play the drums, simply press a key that corresponds with the ones featured on screen. Each key represents a drum sound, as described by the text beneath the trigger letter.
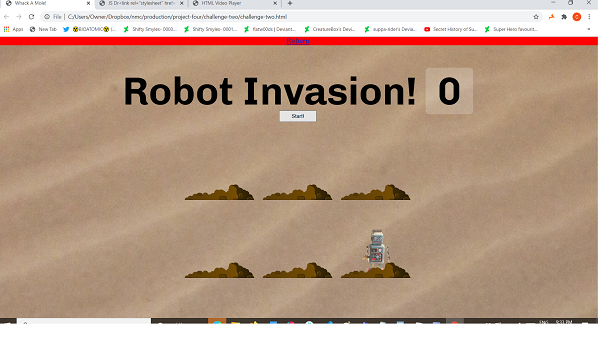
For challenge two, I decided to follow the ‘Arcade’ theme by doing challenge 30, “Whack A Mole Game”. The drum kit was an interesting exercise in interactivity, but I wanted to see how I could create something that function with little intervention on the user’s part. Through this challenge, I learned more about how to assign a certain time to functions (specifically in milliseconds), how to cause functions to activate at random, how to add mouse functionality to a program, and how to make the mouse the exclusive means of triggering a specific function response.
I was able to modify the aesthetic of this challenge primarily through CSS. I altered the backgrounds, swapped the moles for robots, changed the font, and adjusted the “start” buttons size, color, and ‘hover’ state. Making these changes generally went smoothly, though I had difficulties orienting the button correctly. Going forward, I’d like to be able to explore what other kinds of games I could create through JavaScript, and what the limitations of using JavaScript for such a purpose would be.
To play this game, simply click the 'start' button. Click on as many robots as you can before time runs out. Your score will appear beside the title.
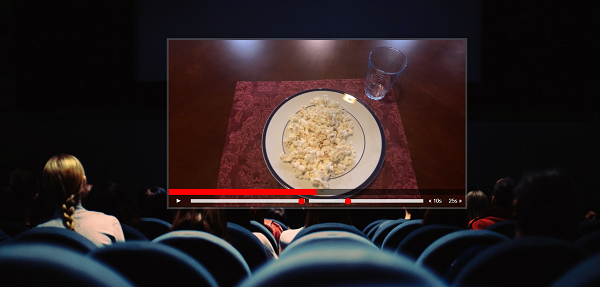
I chose this challenge for a couple reasons. The first reason is that it seemed to make sense to include another ‘entertainment’ aspect to the site in order to keep somewhat close to the theme. The second reason is that I’m involved in video/movie making and I thought it would be a very useful skill for me to be able to present my work via a customized video player. Through the process of creating this program, I learned more about the ‘’parseFloat” function. I also learned about the event ‘mousemove’, as well as what the “offset” property entails. These lessons altogether helped me learned how to add functionality to a video.
As for the modifications, I changed the video and the background image. I also changed the progress bar, playhead, and the border. I also changed the fonts to match the overall aesthetic.
All you have to do is press the triangle "play" icon to start the video. The volume is controlled by the bar on the left, while the video speed is controlled by the bar on the right. To jump to a point in the video, click on the bar (or click and drag). You can also use either the 10 second skip-back button or the 25 second skip-forward button to navigate the video.